Defining attributes for the palette wells
To define attributes for the palette wells, follow the procedure below. (For more information on the attributes that can be defined, refer to The Palette wells.):
- Click on the palette well you want to define attributes for, in the Palette window.
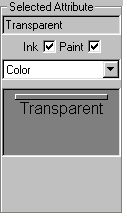
- The current attributes for the chosen palette well are displayed in the Selected Attribute group box at the right of the Palette window:
- The name should be one that is clearly understandable to the Ink and Paint department; for example, 'nose', 'face', 'shoe-upper', 'shoe-sole'. Use the name of the part of the character to which the color should be applied: don't under any circumstances name the colors 'blue', 'orange' etc.
- Set the palette well type by choosing Color, Blend or Line Thickening from the pop-up menu. The appearance of the palette well changes to match your choice.
- Set up the attributes for the type of palette well you chose:
- For a color, choose the layers for which the color can be used by clicking on the Ink and/or Paint check boxes.
- For a blend, set the width over which colors will be blended by typing a value in the Width cell, and then pressing Return.
- Lines thinner than the width specified will be thickened - so a value of '0' will not change the width of any lines.
